|
|
I just moved the web site to a new server.
If you have any problems with pages or downloads,
let me know, Fly safe, Waiter
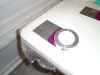
31 March 2005: LIVE WEB CAM
The network Camera is an Axis 205, these are
very inexpensive and have all kinds of features. I use these a lot at work. The
Camera is on my internal network, behind a Linux box firewall
Smoothwall. When you click on the picture icon above, you get
redirected to my IP address, through my firewall, and directly to the camera. I
limited the image stream to one frame per second, and a five minute connection
time (the stream stops after 5 minutes). The built in web server inside the
camera (Linux Apache) is set to limit the number of concurrent connections to
20. That means only 20 people can connect to the camera at any given time.
Hopefully, this will keep my ISP off my back for excess bandwidth usage.
Watch Waiter Work, OK Back to working on the LongEZ.
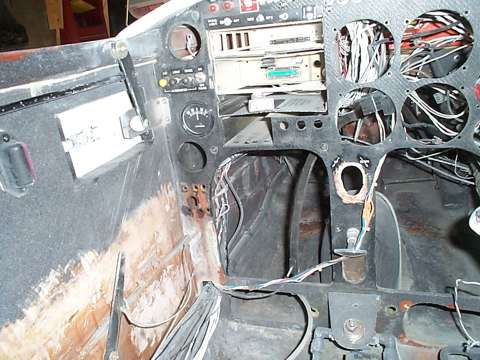
27 March 2005: Expensive Real Estate
This is the first opportunity I've had to get all the parts together, and
actually plan where all the parts will go. Before this retrofit, things were
just added and put where they would fit and function. One of the big problem
areas was that of the cabin heater. I originally put this in the nose and had
#8 oil hoses running to it from the engine compartment through an existing 2
1/2 inch SCAT tube. The heater plenum box also made doing any work in the nose
virtually impossible without removing the heating system.
Anyone who's tried to add something or route wires or hoses from the front to
the back knows what I mean. With the original plans built LongEZ, On the right
side is the control system, so I need to be careful that nothing inadvertently
interferes. There's also the roll trim that pretty much blocks any front to
rear passage of any hose larger than 1/2. I designed and installed an electric
roll trim during original construction, so I have room on the right for a 2 1/2
SCAT tube.
On the left side is the Landing brake and pitch trim. To get any tubes or wires
from the front to the back on this side requires a contortionist, and a couple
weird jogs as they go through the front seat bulkhead in order to get around
the landing brake control system. And forget about any hoses, there's nothing
going down the left side.
ALL THIS IS ABOUT TO CHANGE:
Freeing up real estate.
Landing Brake. By installing Ken Millers electric
Landing brake system, that gets rid of all the manual cable and actuator stuff
going through the front seat bulkhead.
Strong Pitch Trim. This system
will install on the right side, so it frees up the space below the throttle
quadrant assembly, and also the instrument panel area where the cables
penetrated. Its now possible to do a straight shot from the front to the rear
without any interference.
The old heating system hoses came up on the right side of the instrument panel.
This is where the Strong pitch trim system gets mounted, so the heater hoses
have to go.
Considering Weight and Balance, ease of maintenance, I needed to located the
Hydraulic pump and the Heater system. But where.
I need to get the heater out of the nose, but I don't want to put it in the
hell hole. The heater uses an open frame DC motor with brushes. If there are
any gasoline fumes in the hell hole, this could be an ignition source. I did
some fit checking, it could go up against the back side of the front seat, but
this would limit the rear seat leg room. The only place left for the heater is
to build an extended thigh support for the rear seat, and put it in there. This
works out great, I have access to a 2 1/2 SCAT tube that already runs from the
rear to the front (old Heat muff heater) so I can tie this in to blow hot air
to the front seat toe area. Its also an easy and direct shot for the #8 oil
hoses to the engine compartment. This heater can be designed and built to drop
into any EZ, so it should work out very good.
The hydraulic pump is twice as heave as the heater unit, so this will help my
CG issues with the new gear. By installing Jacks
EZNose Lift, That opens up some real estate in the nose. After doing
several test fits, I've decided to make a Frame/bracket, and install the
hydraulic pump in the nose, almost directly above the right Master brake
cylinder. By relocating the heater, there's now easy access in the nose to
perform any maintenance, and the hydraulic pump is located in such a manner so
it won't block anything.
26 March 2005: Good work day


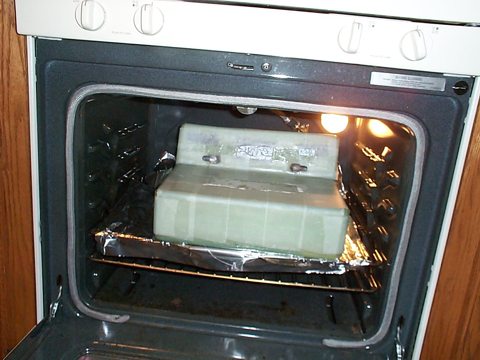
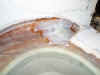
1) I got the sump tank completed. I post cured it in the oven. Baked at 170 deg
F for 4 hours. It's now ready to mount in the hell hole. This is important,
because the hydraulic gear pump will sit on top of the sump tank. I still need
to glass the pump brackets to the top of the sump tank.
2) Needed to elongated the hole for the Speed brake actuator. This is Ken Millers rig.
3) Actuator all mounted and glassed to the back side of the pilots seat. This
is a real easy to do when the plane is upside down.
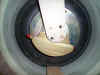
22 March 2005: Tire Clearance inside Wheel Well
One of the problems I noted early on in this retrofit, was a clearance issue
with the tires inside the wheel well. I was very careful to make sure the
Pre-molded wells were as far back as I could get them. In fact, They are up
against the Center Spar.
I tried a couple tricks during the installation to mitigate the problem, these
helped, but there is still a slight rub on the tire as it enters the well. This
is not acceptable. The gear must work flawlessly, no binding, or friction from
any parts.
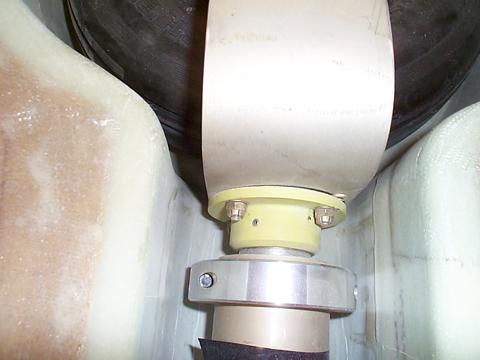
One of the possible fixes to this problem is to change the angle of the half
fork where it mounts to the strut. After making several measurements. I
calculated that a 1/16 shim under the mount would move the axle centerline
forward 1/4 inch. This is more than enough to clear all sides of the wheel
well.
So, In order to test this theory, I loosened the mounting bolts, and slid a
washer between the mount plate and the half fork. When I snugged the bolts back
up, I happily noted there was no longer any rubbing of the tire.
I need to sleep on this for a few days, but it looks like I'm going to mill a
slight angle into the mounting surface of the half fork. This will have the
same effect as my washer shims, and move the axle forward and slightly
outboard. The fork is 0.750 thick, I'll be removing 0.062 from one side, at an
angle.
20 March 2005: Spring Time? Doesn't fell like it
I added a new area to the web site called UPGRADES. In this area I put some
preliminary drawings, electrical diagrams, and initial design review manual for
the landing gear controller. I'll update these as new versions become
available.
The Landing gear is back on the plane, this time with all flight hardware
installed. Even though I was able to shim the forward mounting plate, (it
helped a little) I still get a very small tire contact with the aft side of the
wheel well when the gear retracts. I have a couple other ideas I'll look into a
little later.
Most of the fill and sand is done on the bottom of the fuselage. The portion
where the fixed gear used to be, plus the old fuel blisters, and the old NACA
scoop are now filled in and ready for primer. I also have a very slight hump
where the strake fuel pickup now goes into the fuselage. The Nose area is
complete and also ready for primer. When I get the gear doors on, then I can
finish up the bottom of the strakes.

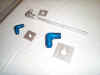
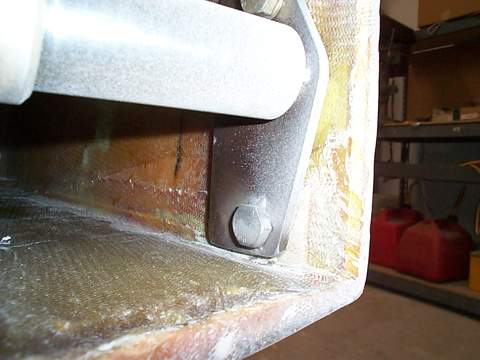
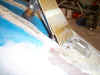
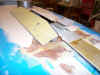
1) The top wing bolt (upside down in this photo) is very difficult to get to
because the trunion pin is in the way. I decided to weld the bolt to the aft
trunion support. that way I don't have to worry about putting a wrench on it.
If both bolts were perfectly parallel, it would be possible to weld both bolts,
and the support would still be able to slide in and out (not so on mine)
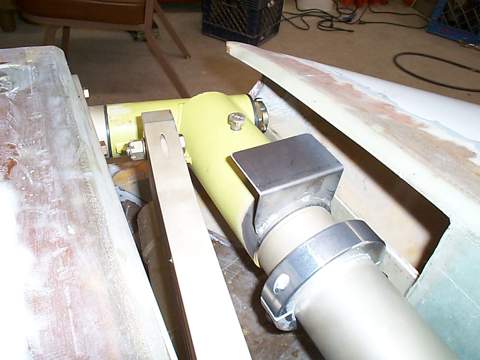
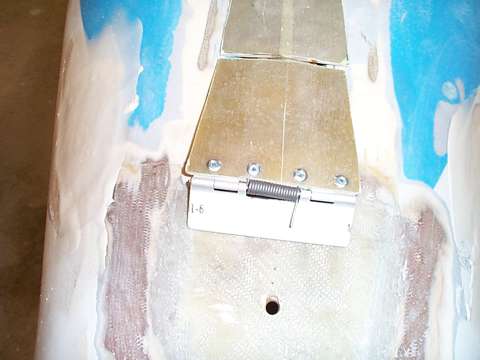
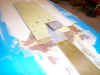
2) Upper gear door support bracket is welded to the steel pivot assembly (Note
the collar, this is for the landing light)
3 & 4) The lower gear door bracket is cut, it needs to be welded (Aluminum)
to the collar. These collars are available from
Wicks. They come in many different sizes and materials (Aluminum,
Stainless, or Steel). This size fits snuggly around the gear leg, and is used
for the lower gear door support, and the landing light support bracket.
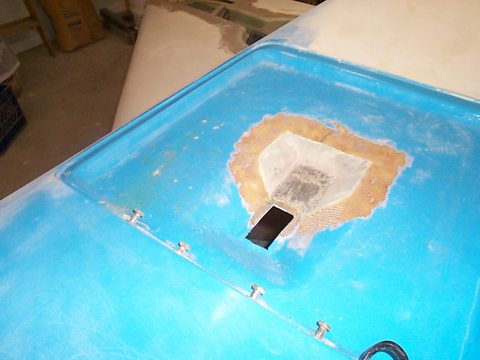
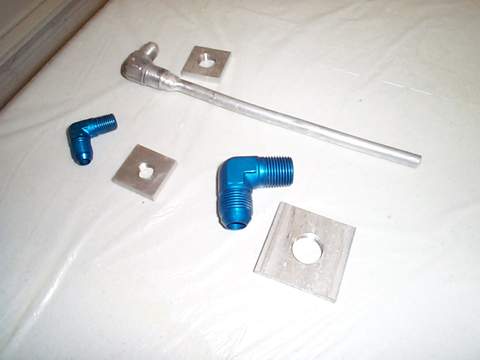
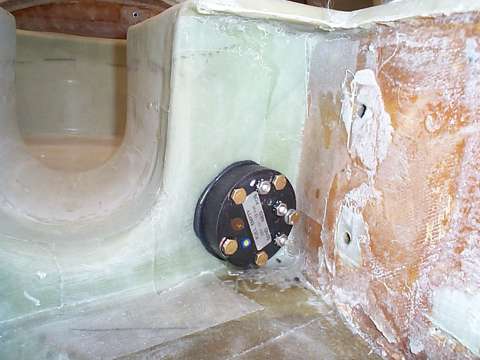
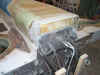
5) Plumbing for the fuel sump. There are 2 each of these. the flat threaded
stock is embedded into the tank, then the fittings are screwed into the
threads.
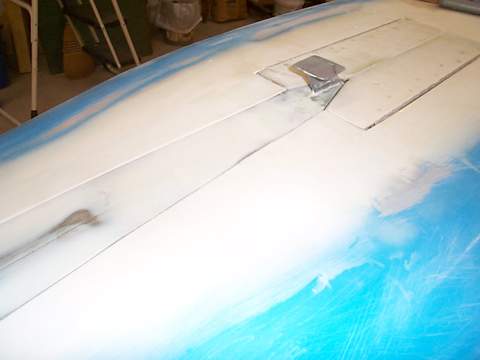
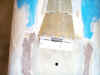
6) The nose gear door area is ready for primer. Looks very good, and is
aerodynamically clean.
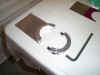
13 March: A Better Mouse Trap?

After Searching for weeks for a torsion spring for my Nose Gear Door, I finally
found one. Its a MOUSE TRAP spring. The Mice around my house are safe for the
time being as I confiscated the traps to reallocate that spring to a more
worthy task.
1) A good view of the newly liberated spring.
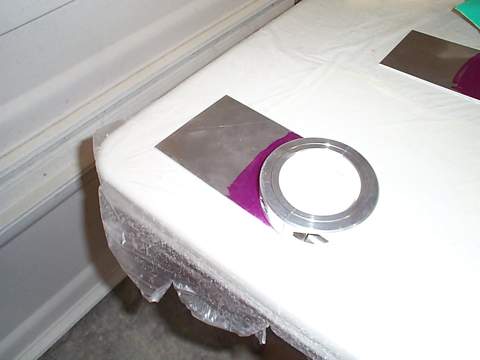
2, 3, 4) Nose Gear door completed. In Photo 2, note the nose skid plate, This
is a piece of 1x1 inch stainless that acts as the nose bumper, and also a Tie
down loop.
5) Fuel level sensors mounted in both strakes. The Strake is upside down in
this photo. The Sensor is in the top of the strake inside the wheel well.
6 & 7) The old sump feed now feed the new internal Hell Hole sump
6 March 2005: Good weekend, No Pictures
For some reason my camera decided not to record pictures, I suspected something
was wrong earlier this week. I should have reformatted the memory card, but
didn't. Fortunately, nothing real important was lost.
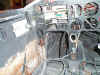
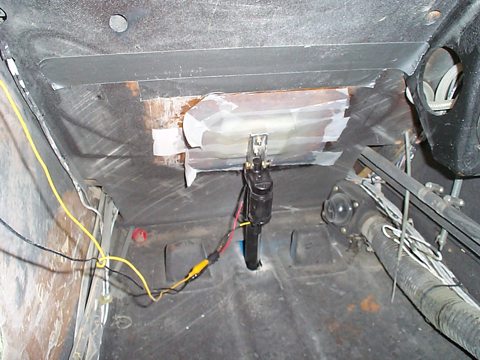
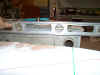
1) Removed the original Brock Throttle quadrant and cables. Made mounting
plates for the new Throttle quadrant assembly. I need to look at a throttle
cable assembly before I mount the new quadrant, to make sure it doesn't
interfere with the the pitch trim. I plan on installing an Ellison Throttle Body,
so I need good push-pull cables.
2) Assembling the Sump tank, I'm now waiting for connectors and hard points,
Once I have these, I can proceed with the final assembly of the sump tank. I
need to get the sump tank installed in the hellhole. The gear hydraulic pump
will mount on top of the sump tank.
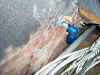
3) Glassed the outside of the lower firewall were the NACA scoop used to be.
Also glassed the cowl mount lip across the bottom, both inside and out. I'll be
installing a new sheet of stainless firewall.
4) Flipped the plane back over on its back to finish the main gear mounting.
Once I close out the end of the Center Spar, I won't have access to the nuts or
any of the hardware, so I've been delaying this. I'm welding #5 nuts to large
area washers, I'll flox these inside the the Center spar to hold the gear
plate. This will allow me to re-torque the mounting bolts without having to put
a wrench on the nuts. I also need to do one lay up of glass on the forward face
of the center spar to fine tune the strut alignment.
Also making main gear door mounting hardware. One bracket will be welded to the
steel trunion arm, one aluminum piece is welded to a collar that fits the gear
leg. I have another collar that will hold the landing/taxi light. These lights
will now be on the gear legs.
5) Removed the PAX seat air vent. This will be relocated up and forward to give
the PAX better air flow.
6) Removed the original Landing brake hardware. This frees up a lot of valuable
space for running cables and tubing on the left side of the fuselage. I'll be
installing Ken Millers electric speed
brake actuator.
7) Reworked the nose door springs.
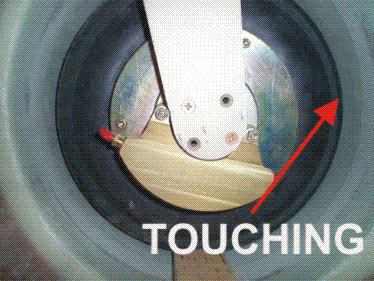
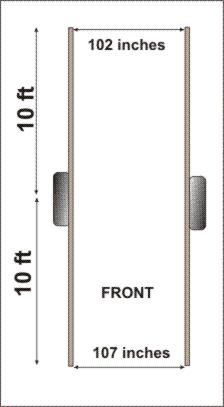
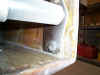
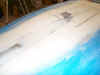
1 March 2005: Main Gear Alignment
Over the last couple days, I've been able to take some initial measurements on
the gear alignment. In the left photo above, the rear of the plane is to the
right. If you look very carefully, you can see that the tire just barely
touches the wheel well on the aft side (toward the right). Both gear do this,
the tire rubs a little on the aft wall.
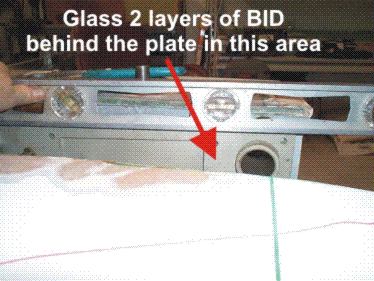
To correct this, I'll remove the main mounting plate, and put one or two layers
of BID under the the two inboard bolts where the trunion passes through the
center spar. I'll tighten the bolts while checking the clearance. When I get
the correct clearance, I'll stop and let the epoxy cure. That should cause the
whole mechanism to turn slightly forward and the tire should then be in the
center of the well.
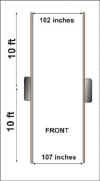
Unfortunately, I also found that the gear has a very slight toe out condition.
The measurements I came up with are shown in the drawing. It looks like about
0.7 degrees toe out.
I'll wait until I correct for the tire rub and get a final measurement on the
toe out situation. I'll check with JD at
Infinity Aerospace this week and see if its possible to realign the
strut. If that's out of the question, I can install a 1/2 degree shim behind
each axel, Wicks has these for about
$20 each.
What caused this is my center spar probably isn't swept back correctly. Instead
of 12 degrees, its like 12.1 degrees Not a big deal. This is the kind of stuff
you run into when doing a retrofit of this magnitude.
Waiter
Waiters GPS Set Time program.
Waiters Flight Data Recorder.
Flight Data Recorder.
Recording aircraft flight data.
Aircraft Voice recorder.
Garmin GPS.
Garmin GPS Serial data Format.
Recording EFIS data.
Capture Serial data.
Convert Raw Data Files.
Free GPS Software.
Reading GPS data.
Reading Garmin GPS data.
Aircraft EFIS Flight Instruments.
Electronic Flight Instruments.
Aircraft Engine Monitor System.
Garmin G format.
Infinity landing gear LongEZ Plans Built Airplane.
Oil Heat system for Homebuilt airplane.
LongEZ Canard and main Wing.
Dynon instrument panel.
Custom Mouse cursors.
Garmin Serial Data Format.
Easy, Free Computer Time setting by GPS Receiver.
Custom mouse pointers.
Custom airplane mouse pointers.
LongEZ Nose gear doors.
Long-EZ main landing gear doors.
LongEZ grasscutter landing gear door.
Custom LongEZ mouse pointers.
Lycoming engine in LongEZ.
MT Propellor with 6 inch propellor extension.
EZNose Lift retractable nose gear for Long-EZ.
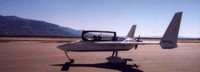
Rutan LongEZ is a plans built aircraft.
High speed homebuilt airplane.
Retractable landing gear for LongEZ.
Custom Airbus mouse cursor pointer.
Custom Velocity mouse cursor pointer.
NMEA 0183 Serial data Format.
Custom Cozy mouse cursor pointer.
Custom Aerocanard airplane mouse cursor pointer.
Custom E-Racer mouse cursor pointer.
Custom Canard airplane mouse cursor pointer.
Custom LongEZ mouse cursor pointer.
Set your Computer clock with this free GPS software.
Custom F15 mouse cursor pointer.
Custom A10 Warthog mouse cursor pointer.
LongEZ Hydraulic pump.
Retractable landing gear for a Long-EZ.
Custom F16 mouse cursor pointer.
Custom F14 mouse cursor pointer.
Custom Boeing 747 mouse cursor pointer.
Custom Boeing 767 mouse cursor pointer.
Custom Boeing 777 mouse cursor pointer.
Custom Boeing 737 mouse cursor pointer.
GPS Time Sync.
Custom Boeing 727 mouse cursor pointer.
Landing gear door rigging.
Custom Boeing 757 mouse cursor pointer.
Custom MD80 mouse cursor pointer.
Custom DC9 mouse cursor pointer.
Setting your computer to a GPS Time.
Custom RV mouse cursor pointer.
Downdraft cooling for LongEZ.
Speed brake installation.
Waiters Flight Data Recorder.
LongEZ Baggage pods installation instructions.
Waiters Custom Airplane mouse cursors.
Free GPS Time Sync Program.
LongEZ Intercom installation.
Major airframe overhaul of plans built EZ.
Weight and balance for a LongEZ.
Weight and Balance spreadsheet download for a Long-EZ.
LongEZ fuel system design.
How To remove the wings from a LongEZ.
How To remove the canard from a LongEZ.
Waiters GPS Time sync program runs on PC.
How To remove the engine from a LongEZ.
Long-EZ Downdraft cooling for a Lycoming O-320.
Long-EZ Wing Removal and installation instructions.
Waiters Retractable Landing Gear Controller.
Landing Light installation in LongEZ.
Install free EFIS software on your PC.
How to Put several longezs in one hangar.
How to install an Infinity Aerospace Retractable landing gear in a Long-EZ.
How to install DownDraft cooling on a Long-EZ.
GPS Time.
Setting you computer clock to GPS time.
How to set your Computer clock to GPS Time.
Using your GPS Receiver to set your computers clock.
Low cost GPS receiver used to syncronize Computer clock to GPS time.
Neat Canopy stay system for an EZ.
Cabin Heat using engine oil as source.
Waiters GPS Time, Syncronize your PCs internal clock with the GPS satellite.
Remote display of EFIS on a PC.
Cabin Oil Heater for a LongEZ.
LongEZ Landing Gear Door.
Rigging a LongEZ Landing Gear door.
Icom Radio in LongEZ.
How to Build a Manometer.
LongEZ Electrical system upgrades.
Grand Rapids EMS.
Custom Windows cursors.
Custom Windows mouse pointers.
LongEZ Cowling for downdraft cooling.
Record holding LongEZ flights.
Using a PLC for a retractable Landing Gear Controller in a LongEZ.
Syncronize your PCs clock to a GPS receiver.
Airspeed vs pressure lookup tables.
How to build a homebuilt airplane.
Video of LongEZ taking off.
Grasscutter landing gear door.
EZ Nose Lift installation.
Landing Gear status indicator.
Shareware software can set your PC clock vie a GPS receiver.
Landing Gear controller computer for LongEZ.
Landing gear doors.
Dynon EMS10 installed in instrument panel of a LongEZ.
Dynon EFIS D10A installed in instrument panel of a LongEZ.
Flight Data Recorder Software.
PlansBuilt LongEZ.
Video of High G turn in a Long EZ.
Strong Pitch Trim system installed in a LongEZ.
Strong Pitch Trim mounted on Left Side of Long-EZ.
Free software sets your PC clock with a GPS receiver.
Video of LongEZ Taking off.
Video of LongEZ Landing.
Video of LongEZ performing a high G turn.
Video of Infinity Landing gear being retracted into a LongEZ.
LongEZ Color White.
Painting your LongEZ.
White LongEZ.
Camoflage LongEZ.
Infinity Landing Gear for LongEZ.
Strong Pitch system.
|